Flexo print defects cost you more than scrap and rework. They erode customer confidence, slow down your pressroom, and eat into already tight margins. Building a proactive strategy to detect and correct flexo print defects before you hit full production is one of the fastest ways to protect quality and throughput.
5 Flexo Print Defects to Look Out For
Below are five common flexo print defects, how to recognize them during makeready, and how to correct them before they become a full-run problem.
1. Dot Gain and Dirty Print
Dot gain and dirty print are two sides of the same coin. In both cases, halftones and fine details print heavier than intended, so highlights plug, midtones look muddy, and type loses edge clarity. On press, this shows up as darker images, loss of detail in small copy, and solids that look over-inked and soft instead of crisp.
To catch it early, watch your control targets, highlight dots, and small reverse type during setup. If they are closing up or look darker than your proof, you are already seeing dot gain and dirty print long before your customer does.
How to fix it before you hit the press:
- Reduce impression pressure between the plate and substrate, and between the anilox and plate.
- Step down to a lower-volume anilox or higher line count better matched to the job.
- Check plate mounting tape hardness, thickness, and trapped air; remount if needed.
- Verify ink viscosity and pH are within spec, then make small, controlled corrections.
- Clean plates, anilox rolls, and doctor blades to remove dried ink and contamination.
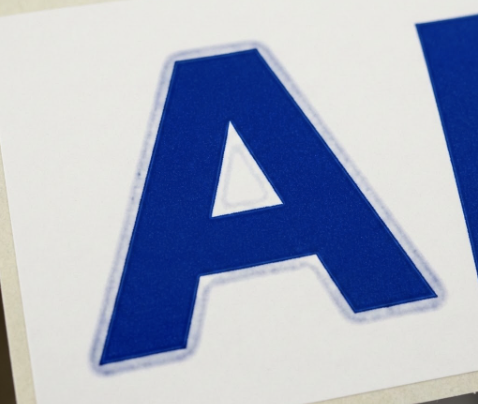
2. Feathering and Halo
Feathering occurs when ink creeps beyond the intended edge of characters or graphics, giving them soft, jagged edges instead of sharp boundaries. A halo shows up as a faint ring of ink around images or text, often due to too much pressure or poor ink transfer control.
Both problems reduce perceived print quality immediately. Straight lines look fuzzy, barcodes and small type become unreliable, and solid edges that should be knife-sharp develop a glow or blur that customers will notice.
How to fix it before you hit the press:
- Back off plate impression until you get clean, sharp edges without starving the image.
- Re-balance ink viscosity; if the ink is too thin, it will spread, and if too thick, it can build up at the edges.
- Confirm the correct plate durometer and relief depth for the substrate and graphics.
- Check substrate surface treatment and cleanliness so ink wets and releases predictably.
- Inspect image carriers and mounting tape for damage, swelling, or trapped air.
3. Bridging and Filling In
Bridging happens when halftone dots or fine elements that should remain separate begin to connect, effectively building “bridges” of ink between them. Filling in is the next stage of the same defect, where counters in small type, fine rules, or highlights plug completely and lose definition.
You will see this first in small copy, fine screens, and intricate logos. If you notice that dots are starting to touch or small white spaces are disappearing on your proof pull, you are seeing bridging and filling in before it turns into a full-blown quality issue.
How to fix it before you hit the press:
- Reduce overall impression pressure to limit ink squeeze-out into non-image areas.
- Move to a finer, lower-volume anilox that can control ink film thickness more precisely.
- Adjust ink viscosity and drying speed so ink transfers cleanly without flooding detail.
- Make sure plates are not swollen or over-wiped; replace or reimage if relief is compromised.
- Work with prepress to set realistic minimum dot, line weight, and type size for flexo.
4. Pinholing and Mottled Solids
Pinholing shows up as tiny unprinted spots within what should be a solid ink area. Mottling appears as uneven ink laydown, with cloudy, patchy density instead of smooth, uniform coverage. Both are immediately visible in large solid panels and brand colors, where ink film consistency is critical.
If your drawdown or first pulls show specks of the substrate peeking through, or if density readings vary widely across a solid, you are looking at pinholing and mottling. These defects can be driven by ink, anilox, substrate surface, or some combination.
How to fix it before you hit the press:
- Clean anilox rolls, plates, and ink delivery components thoroughly to remove dried ink and debris.
- Adjust ink viscosity, surface tension, and solvent balance to improve leveling and wet-out.
- Verify substrate surface energy and treatment; increase treatment or switch material if needed.
- Increase or balance impression slightly to ensure complete ink transfer without crushing dot.
- Consider a coarser anilox with appropriate volume for extensive solid coverage if you are starving ink.
5. Misregistration and Gear Marks
Misregistration occurs when colors are not aligned, creating halos, color shifts, or gaps between separations. Gear marks (or banding) appear as repeating horizontal or vertical lines that track with press circumference or gear pitch, often most visible in midtones and large solids.
During setup, you will see registration issues first on your register marks, small type, and fine-line graphics. Gear marks often pop out under consistent light or in density readings as periodic light and dark bands, particularly at stable running speeds.
How to fix it before you hit the press:
- Re-register plates carefully, checking plate cylinder, impression cylinder, and die station.
- Verify that web tension and guide systems are stable and appropriate for the substrate and speed.
- Inspect gears, bearings, and drive components for wear, backlash, or vibration and correct as needed.
- Match run speed to press condition; some banding only appears at certain speed ranges.
- Check plate mounting quality and tape uniformity; remount any suspect plates.
Catch Flexo Print Defects Earlier with Anderson & Vreeland
Catching flexo print defects early is part process, part equipment, and part training. When your team has the right plates, sleeves, anilox technology, and diagnostics tools in place, you can spot problems on the proof pull instead of halfway through the run.
Anderson & Vreeland helps flexographic printers build a more stable, predictable print process with optimized plate-making systems, pressroom consumables, and technical support focused on real-world defect reduction. If you want fewer flexo print defects, faster makeready, and more consistent jobs across shifts and substrates, talk with an Anderson & Vreeland specialist about a pressroom assessment and tailored solution set for your plant.