Many printers have densitometers and spectrophotometers in their prepress areas or press rooms, but often don’t use them to their full potential. This can be due to various reasons: fear of incorrect measurements, not understanding the proper measurement sequence, or confusion about the device’s functions. This guide provides an overview of the most commonly needed measurement functions of the Xrite eXact 2 spectrophotometer and how to use them efficiently.
Understanding Your Xrite eXact 2
Determine the Version
The Xrite eXact 2 comes in multiple versions, from a basic densitometer to the advanced XP version designed for measuring on film substrates. Below is a chart describing the most common functions and differences between each device, as well as the available aperture sizes. Selecting the right aperture at the time of purchase is crucial, as modifying it later can be expensive.
Configuring Xrite eXact 2 Settings
Setting the proper measurement configuration before taking readings is essential. Changing settings like the lighting condition or observer angle can yield different results for the same printed color. Below is a list of options within the General Settings menu, with recommendations for the G7 specification where customer parameters are not defined. Always document the General Settings used for future reference and communication.
General Settings
- Measurement Condition:
- M0 = Illuminant A
- M1 = Includes equal amounts of UV and visible light
- M2 = UV Cut – standard illumination, but filters UV light
- M3 = Polarization
- Illuminant Observer:
- D50 is most commonly used in North America.
- D65 is commonly used in Europe.
- The 2-degree observer angle is most used in flexo printing.
- Density Status:
- Status T (wide band) is generally selected in North America.
- Status E is often used in Europe.
- Density White Base:
- “Absolute” includes the paper in the measurement, resulting in higher density measurements.
- “Paper” requires measuring the base paper substrate first, then subtracting it from the overall density measurement.
- Density Precision:
- Number of decimal places shown on the results display.
Function Settings
- Tone Value Settings:
- Murray-Davies formula includes optical dot gain.
- Yule-Nielsen formula relates more to physical dot gain.
Measuring Density
Steps to Measure Density
- Accessing the Density Function:
- On the eXact menu screen, select “Basic Tool,” then tap the triangle icon at the bottom center of the screen.
- Taking a Measurement:
- Place the aperture over the color patch, close the clamshell, and wait for the beep. The reading will be displayed on the screen.
- Display Options:
- Choose between Density, Density Trend, or All Densities.
- Measure the paper if required, select the color, measure the sample, and view the data.
Measuring for Neutral Density (G7)
To achieve a relatively neutral density for the CRPC-6 2013 set, use the following target values:
- K 25% target = 0.22; CMY Build 25% target = 0.25
- K 50% target = 0.49; CMY Build 50% target = 0.54
- K 75% target = 0.89; CMY Build 75% target = 0.91
Use the CMY Balance function to achieve a neutral density when measuring CMY overprints.
Measuring Dot Area / TVI
- Accessing the Tone Value Function:
- In the Home menu, select Tone Value.
- Setting the Paper Value:
- Measure the base substrate by placing the eXact aperture on the non-printed area and taking a measurement.
- Measuring Solid Ink Density:
- Measure the solid ink density (100%) of the ink color.
- Measure the tint values of the same ink color and record.
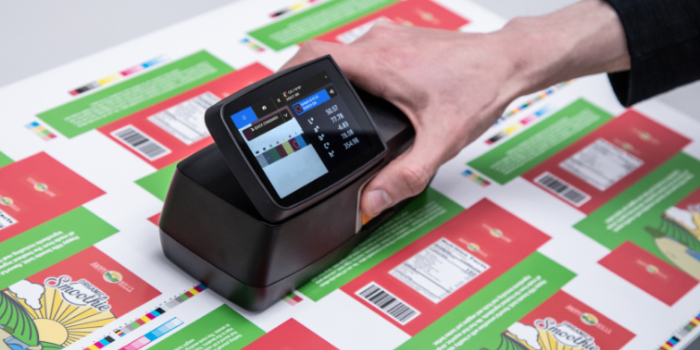
Measuring Color Information (Lab*/Lch)
To measure color information or the difference between two samples, use the eXact 2 (not the basic densitometer version).
- Understanding Lab Values:*
- Each color has coordinates of L* (lightness), a* (green to red scale), and b* (yellow to blue scale).
- Measuring Color:
- Select the Colorimetric Measurement function from the second page of the “Home” selections.
Help and Training
For more information and training, check out the following resources:
- Free tutorials on eXact functionality
- Xrite certification programs
- “Going Beyond Density” training session, free with eXact purchase
Updating Pantone Library
- Digital versions of standard Pantone libraries are available for download.
- Special libraries can be purchased from the website.
Calibration
- The device will notify you when calibration is needed. The calibration plaque is included within the device.
By following this guide, you can unlock the full potential of your Xrite eXact 2, ensuring accurate and efficient color measurements in your printing processes.
For expert assistance and more information on optimizing your printing processes, reach out to Anderson & Vreeland today. Our team is here to help you achieve your best results!