Achieving precise registration and consistent print quality begins long before the press starts running. One of the most crucial steps in the flexographic printing workflow is flexographic plate mounting—the process of properly securing the print plate to the cylinder or sleeve. Even the most advanced press setup can’t compensate for poor plate mounting, which can lead to costly defects such as misregistration, bounce, or image distortion.
Flexographic Plate Mounting Tips and Techniques
IIn partnership with industry leaders like 3M and Anderson & Vreeland, this guide breaks down key plate mounting techniques that ensure precision, repeatability, and long-term performance.
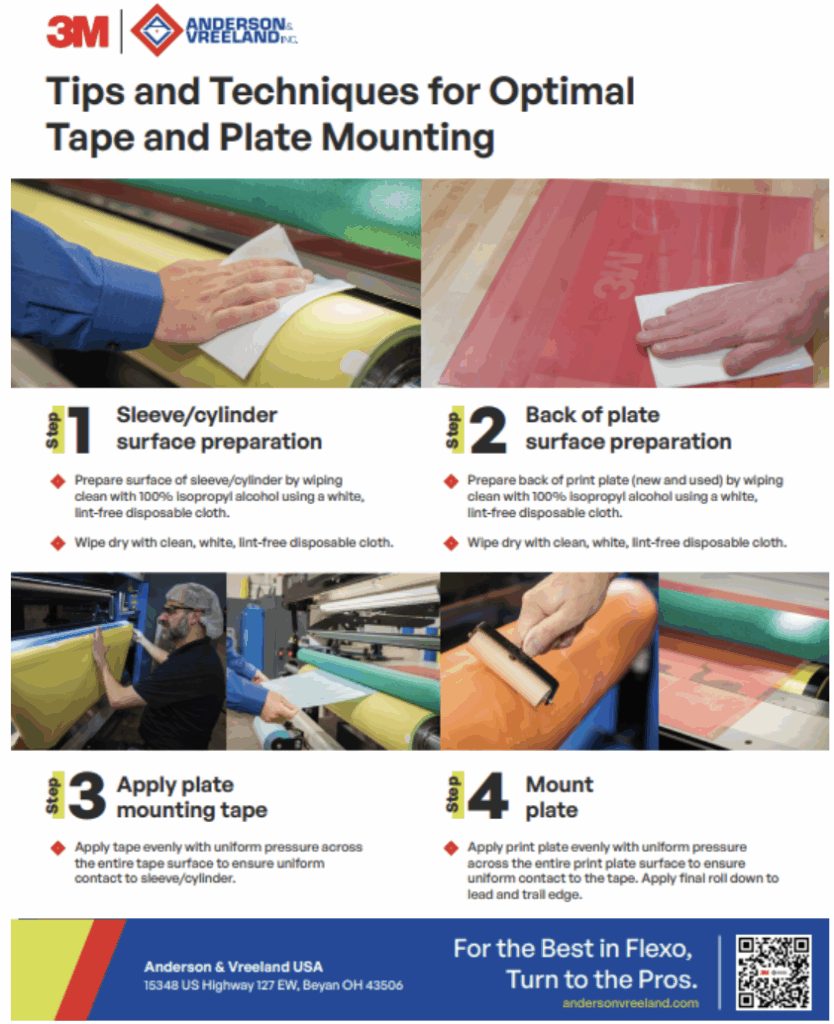
1. Surface Preparation: Sleeve/Cylinder and Plate Back
Clean, dry surfaces are essential for achieving strong, consistent adhesion with plate mounting tape. Before application, both the sleeve or cylinder and the back of the flexographic plate must be free of contaminants.
Clean the surfaces: Wipe the sleeve, cylinder, and plate back with 100% isopropyl alcohol using a white, lint-free cloth. This removes dust, ink, adhesive residue, or oils that could compromise adhesion.
Dry completely: Immediately follow with a separate lint-free cloth to ensure both surfaces are completely dry.
Proper preparation ensures the sleeve, cylinder, and plate are ready to form a secure, uniform bond with the plate mounting tape.
2. Apply Plate Mounting Tape
The precision of the final print is only as good as the quality and application of your plate mounting tape. Working with trusted brands like 3M Cushion-Mount™ tapes, converters achieve optimal print performance while balancing adhesion, cushioning, and easy demounting.
- Apply even uniform pressure: Press the tape across its entire surface to ensure full contact and eliminate trapped air pockets. A soft roller or squeegee can help achieve even contact without stretching or distorting the tape.
Taking time to mount the tape properly ensures uniform pressure distribution, resulting in consistent print quality and accurate registration.
3. Mount the Plate
With the tape securely applied, it’s time to position and mount the flexographic plate.
- Align carefully: Use registration marks or plate mounting systems (such as those provided by Anderson & Vreeland) for precise alignment.
- Apply uniform pressure: Lay the plate evenly over the tape, starting from one edge and working progressively to the other.
- Roll down edges: Apply a final roll down to the lead and trail edges of the plate. This step ensures strong adhesion and prevents lift during press operation.
- Ensure that when trimming, the blade is held at a 45-degree angle to avoid uneven cutting and overlapping on the seam.
Well-mounted plates provide stability, improve print consistency, and reduce downtime associated with re-mounting or press adjustments.
Why Precision Plate Mounting Matters
Proper flexographic plate mounting directly influences every aspect of pressroom performance, including:
- Registration accuracy: Prevents misalignment and print distortion.
- Print consistency: Promotes even impression pressure across the substrate.
- Reduced waste: Minimizes setup time and print rework.
- Press efficiency: Ensures faster startups and fewer interruptions.
Using the correct materials—like 3M mounting tape—and precise techniques recommended by Anderson & Vreeland’s flexo specialists enhances both print quality and operational efficiency.
Partner with Anderson & Vreeland for Plate Mounting Solutions
Anderson & Vreeland provides industry-leading equipment, tapes, and technical support for every stage of the flexographic plate mounting process. From automated mounting systems to customized 3M mounting tape suggestions, our team helps the flexographic industry optimize productivity and print quality performance.
Explore our range of solutions for plate mounting systems and flexo prepress technology to elevate your operation’s print quality and consistency.
Ready to take your flexo printing to the next level? Connect with the specialists at Anderson & Vreeland for personalized guidance, the right plate mounting products, and support that keeps your press running flawlessly. Let’s find the perfect solution for your workflow—talk to our team today!